Introduction
VMware Cloud on AWS allows customers to move their existing on premise VMs to the AWS. However, these are not moving directly to EC2, but are running on a baremetal server running VMware, within an AWS account. It allows you to extend your datacentre into the the cloud, providing the 7th “R”, relocate.
There are several use cases for VMware Cloud on AWS:
For applications are not suitable to go Cloud native. EC2 is an option but VMware on AWS is an additional alternative that might be a better fit for skills, or for licences.
DR - Use VMware on AWS as an alternative location, You can then use SRM for failover.
Workforce mobility - VDI in the cloud using AWS’s network, which is probably faster than most company’s own networks.
Migrate then modernize, while bringing licences across.
Requirements
You need the following:
An AWS account
A VMware myVMware account
Credit card with $2k available (non-refundable, and this isn't covered by free-tier!)
Additionally, if you want to stretch a subnet, you will required VDSs on premise, which will required vSphere Enterprise Plus licenses. You can then go to the VMware site, logon, and select the type of environment that you want to create.
Account Types
There are then two types of accounts.
Single Host - Intended for POC/Development. Only available for 30 days. No SLAs. No updates.
Production - 2 hosts (i3.metal only, 3 for i3en.metal) to 16 hosts. 6 minimum for a stretched cluster. SLAs are dependent on architecture.
Host Types
VMware Cloud on AWS is currently offered on two host types.
i3.metal - 36 cores, 512GB RAM. NVMe storage (3.6TiB cache, 10.7TiB raw capacity tier)
i3en.metal - 48 cores, 768GB RAM. NVMe storage (3.6TiB cache, 45.8TiB raw capacity tier)
Both host types can be bought on-demand, or 1-year/3-year subscription.
Costing Tools
You will need to work out what hosts you need, and how much they cost. Thankfully, VMware have several tools that can help with understanding the required size and cost.
The Pricing Calculator will allow you to choose the region, numbers of hosts, and billing type.

The sizer will allow you to select different host/workload types, and will then give you an estimated resource size.

Lastly, you can then use the TCO calculator to compare the costs.
Additionally, if you have vRealize, they can also use that for performing calculations using the live data from your environment.
Connectivity
In most cases, you will want some kind of connectivity between on premises and your cloud environment. This could be for accessing services, management, or migration of workloads. There are two ways to connect from your datacentre to VMware Cloud on AWS.
Direct Connect:
Will take months to implement if not already in place
Can use either dedicated or hosted ports
The termination point in AWS needs to be pointed to either AWS native services, or the VMware Cloud on AWS.
VPN: This can be either:
- Layer 2 stretched network (requires NSX Standalone Edge Client on premise)
Or:
- Layer 3 IPSEC tunnel. Each side has a different subnet.
The VPN connection can also be used as a backup for a Direct Connect connection.
VMware Cloud on AWS Foundational Technology
VMware Cloud on AWS has the following basic elements:
vCenter
NSX-T
vSAN
These elements are the same as the VMware Cloud Foundation. Additionally, you can include SRM (Site Recovery Manager) in your VMware Cloud on AWS environment for a small additional charge.
vCenter
vCenter is the management platform for VMware Cloud. This means that you will have two vCenters, one in the cloud, and one on premise. Once you have a secure connection between your on premise environment and VMware Cloud on AWS, you can enable Hybrid Linked Mode. Enabling this will allow you to manage both environments from the same location, your vCenter in the cloud.
NSX-T
NSX-T is the network virtualization technology, and is used for programmatically managing network resources, including firewall elements, routers, switches, etc.
vSAN
vSAN is the storage virtualization technology, that allows for the creation of logical datastores using the physical storage in each server, rather than a dedicated and separate physical SAN. When configuring storage, you need to consider the raw capacity on the hosts, as well as the RAID configuration. So if you have a Stretched Cluster with RAID1, 1TB of VM storage will required 2TB (because of RAID1), but then needs to be stored on both sides of the Stretched Cluster, meaning 4TB in total. RAID5 can be used as an alternative but the performance considerations will be different. There is a vSphere storage calculator here.
There was one interesting feature that was offered called Elastic vSAN. which could be used when using hosts that have RBS backed storage. Elastic vSAN allows you to determine the total amount of storage up front, which can be greater than the storage that would normally be available on the i3 instances using standard vSAN with local disk. One additional advantage of Elastic vSAN is that if there is a host issue, the data does not need to be resync’ed to another host. The RBS volumes can simply be moved. Unfortunately, Elastic vSAN was depreciated June 23, 2021, but it doesn't necessarily mean it is gone for good.
vCenter Configuration
VCenter will typically be configured in Hybrid Linked Mode to allow management of both environments. There is an optional vCenter Cloud Gateway Appliance that will make the connection between the two vCenters simpler.
vCenter Hybrid Linked Mode
Hybrid Linked Mode is similar to vCenter Enhanced Linked Mode. It will allow you to:
Manage both environments from a single interface
Use your on premise SSO for logins
Migrate small workloads between cloud and on premise (alternatively, you might choose to use SRM or HCX)
Share tags and tag categories between the environments
Connect vCenters of different versions.
There are two ways that Hybrid Linked Mode can be enabled, either with, or without an on premise vCenter Cloud Gateway Appliance. In order to use Hybrid Linked Mode, you will need to satisfy the following requirements:
NTP service configured for both vCenters (or other authoritative time source)
Latency of 100ms or less between the vCenters
A user will need to be given the “Cloud Administrator” permission and have access to the on premise environment.
The VMC Console Connectivity Validator can be used to verify that the connectivity is suitable, before attempting to establish Hybrid Linked Mode.
You will need to link your SSO domains and configure DNS on your management gateway if connecting the vCenters directly rather than using the Gateway Appliance. A full list of required ports for connecting directly can be found here.
vCenter Cloud Gateway Appliance
If used, this appliance is installed on the on premise VMware cluster. You will need to have the available VM resources to host the appliance (8 CPUs, 24GB RAM, 190GB disk), and the vCenters will need to be 6.5 Patch D, or later. Your internal Platform Services Controller (PSC) will also need to be configured to use port 443.
Using the appliance will mean that you only need to open port 443 between your vCenter in AWS, and the appliance on premise, but you will still need 902 to your ESXi hosts. Additionally, you will not need to link your SSO domains, and this should make your configuration and management easier.
If the on premise vCenter that you are linking to, is itself linked to other internal vCenters using Enhanced Linked Mode, you will need to ensure that the Gateway Appliance can connect to all of the other internal vCenters.
ESXi Stretched Cluster
A stretched cluster is a single VMware cluster that has been deployed in VMware Cloud on AWS across two AWS availability zones. This allows for increased High Availability and offers some protection in the event that an AZ goes down. It should not be considered DR by itself though as a region outage would take down the entire cluster.
To have a stretched cluster, you will need the same hardware configuration (number of hosts, type of hosts) in both AZs. This effectively means that there is a minimum of six hosts required (three in each AZ), and any additions need to be done two at a time (one on each side). You will also need a subnet in each AZ for use. The stretched cluster configuration is something that needs to be done at the time of creation of the cluster. You cannot stretch an existing non-stretched cluster.
One thing to note is that AWS charges for traffic between AZs. This will mean that traffic between the two halves of the cluster is chargeable.
When you look at the configuration of you cluster in vCenter, you will also see an additional host in a 3rd AZ. This is the Witness, and you will not be able to manage that host.
HA within the cluster can be configured for “dual-site mirroring”, which will fail all VMs across on the event of a failure of either side, or recovery can be configured from just one side of the cluster to the other.
Of course, the streched cluster is optional. You could still choose to use two cluster in separate AWS regions instead, and replicate VMs between the two. That would, arguable, provide better DR, but perhaps not the HA you need.
HCX
HCX (HCX Advanced, not Enterprise) is core component of many migrations of VMs from on premise to VMware Cloud on AWS. It also provides DR functionality. Some of the main features of HCX are:
Any-to-Any mobility - move workloads to/from many different platforms
Large scale migrations - support for 1000’s of VMs with no downtime
Hybrid Networking - migration aware routing, WAN optimization, and L2 extensions.
HCX have the following requirements in order to do migrations:
100Mbps bandwidth
VDS (Virtual distributed switches) on the on premise environment. Standard switches are not supported.
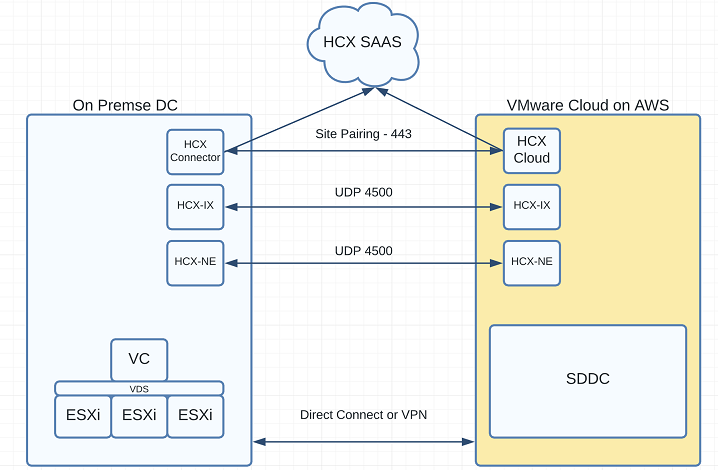
To use HCX, it needs to be enabled on the cloud SDDC, and then an HCX Connector Appliance is deployed to the on premise environment. A Cloud Appliance is then deployed to the cloud SDDC. The two components will then connect to the HCX SAAS service for activation.
Once that has been done, the Site Pairing can be configured between the Connector Appliance and the Cloud Appliance, and the profiles configured.
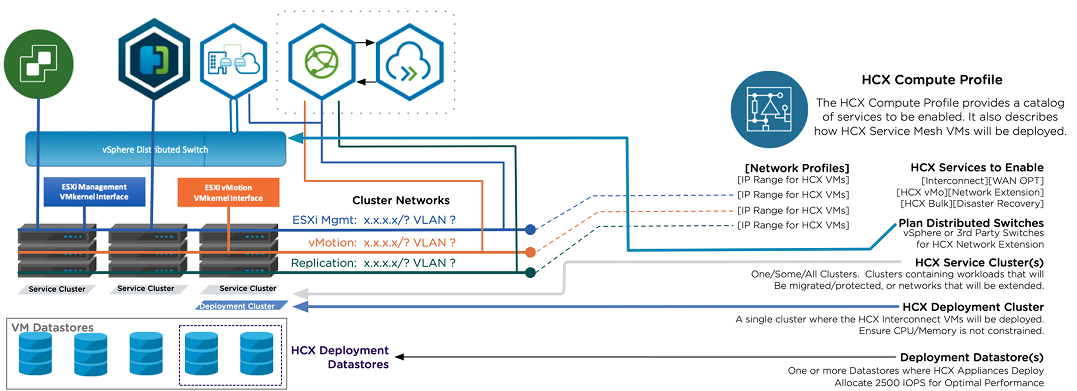
Compute Profile
The Compute Profile provision the infrastructure on the source and target sites, and provides the placement details (hosts, storage volume) for where the required appliances will go. The profile contains the following:
Profile name
Services to activate (IX, NE, etc.)
Cluster that will host the services
The deployment cluster that will host the resources
Datastore information
Virtual switch information (or NSX Transport Zones if NSX is used on premise).
This can be created using the “create compute profile” wizard. Note that the profile won’t create the resources, that is done as part of the Service Mesh.
Network Profile
The Network Profile will also contain the network configuration for the appliances to connect to, and allows networks and IP addresses to be pre-allocated. The following information will be needed:
HCX uplink - normally the Management network
HCX Management - normally the Management network
HCX vMotion - information about the ESXi vMotion network
HCX Replication - normally the Management network.
Service Mesh
Once the profiles have been created, the Service Mesh can be created. The Service Mesh will then deploy and configure the appliances on both sites.
HCX Appliances
Network Extension Virtual Appliance (NE)
The Network Extension Virtual Appliance provides the Layer-2 extension from environments that use a Virtual Distributed Switch, or that use NSX. This is the component that will allow VMs to keep the same IP and MAC address when moving to another environment, and this will also eliminate the tromboning effect that occurred with earlier NSX implementations, where traffic may have to cross a network to enter a virtual network. An NE appliance can support up to 8 networks, but you can use multiple NE appliances if required. The default gateway for the extended networks will exist on the on premise environment.
Interconnect Appliance (IX)
The Interconnect Appliance is the HCX component that is used to provide the tunnel between the sites, and vMotion migration capabilities between the two environments. When this is deployed, it will include deployment of the Mobility Agent service that will appear as a host object in the vCenter server. The Mobility Agent is the mechanism that HCX uses to perform vMotion, Cold, and Replication Assisted vMotion (RAV) migrations to the destination site.
WAN Optimization Appliance (WO)
The WAN Optimzation Service will provide better performance between your sites by using data deduplication and and line conditioning. This will allow the migration of VMs to destination site, without necessarily waiting for a Direct Connect connection (DX is still required for a pure vMotion migration). The WAN Optimization Appliance performances this service.
NSX
While NSX is used in the cloud, but not normally on premise in a lot of migrations (as HCX is used), it can be useful to have an understanding of how NSX works.
NSX Versions
VMware Cloud on AWS uses NSX-T. It is possible that a customer may have NSX-V on premise, but the two are not compatible.
NSX-V
NSX-V was developed to be tightly integrated into the vSphere platform. As such, it requires vCenter, and is specific to the vSphere hypervisor. NSX-V uses VXLAN for encapsulation of network traffic.
NSX-T
NSX-T was developed to be more hypervisor independent, and so will run with KVM, as well as AWS and Docker workloads. Another big difference is that NSX-T uses the newer GENEVE protocol rather than VXLAN for encapsulation. GENEVE allows for more metadata to be contained within the packet header and is a more modern implementation of encapsulation.
NSX-T Routing
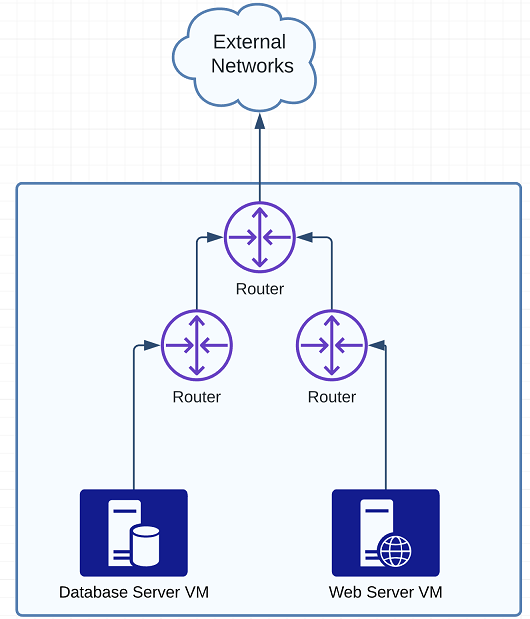
NSX Routing uses two routing tiers, Tier 0 and Tier 1 These are used within the NSX environment, and also to provide connectivity to the physical network. These are created on Transport Nodes, and mean that routing is actually performed on the ESXi host itself, which is running the VM that the source traffic is coming from. The only time you need to go to a specific ESXi host is when you are routing traffic to external networks, in which case it will need to go to a separate Edge node. A common configuration can be to have typical application tiers on different segments. So you might have database/application/web servers on different networks with connectivity configured between those. From a logical point of view, each segment would be connected to a separate router, and the routers are connected to the Tier 0 router. This allows for greater scaling.
Site Recovery Manager
SRM is an additional VMware native automated DR application. SRM is not included in the base package for VMware Cloud on AWS, but many customers may already have SRM for their on premise environment. It integrates with existing VMware components to provide a seamless failover in the event of a disaster. This can include the replication of VMs between two environments, as well as configuration of protection groups and recovery plans. When these are correctly configured, a selection of VMs can be moved across to another site (and reconfigured if required), and started automatically in priority order. Besides DR, this makes it a potential tool for migration too.
Replication Servers will be the VMs that are protected. At the DR site, you will see placeholders for each of these protected VMs. The VMs are typically replicated across using vSphere Replication, which allows for vendor independent replication.
Protection Groups can be used for configuring application groups. For instance, you might have a protection group that groups VMs by function.
Recovery Plans are the most important elements from a recovery point of view as the Recovery Plans act like a Run Book during the recovery process. These will determine startup orders, allow custom actions, and can be configured for testing and recovery.
Useful Links
Install Checklist A - HCX with a Private Cloud Destination Environment (vmware.com)
Install Checklist B - HCX with a VMC SDDC Destination Environment (vmware.com)
Appendix - HCX Installation Summary Steps (vmware.com)
comments powered by Disqus